Students apply for studying at a University of their choice to the Joint Admissions and Matriculation Board (JAMB). JAMB conducts the Universities Matriculation Examination (UME) and sends the results of the students, who have passed the UME, in electronic form (file on CD) directly to the universities. Students check their results online on the JAMB website. Students who have passed the UME can then apply online for the Post University Matriculation Examination (PUME) conducted by Uniben directly on the PUME Application website.
Relevant fields that will be extracted from the JAMB data for further processing are:
Registration Number
Last Name
Surname
Other Names
State of Origin
LGA (Local Government Area)
Date of Birth
Age
Sex
1st Choice Course of Study
2nd Choice Course of Study
1st Choice University
2nd Choice University
JAMB Score
The extraction is done manually. The Portal Manager uploads and imports the data.
The student buys an Application Access Card and enters the Access Code (PIN) together with his/her JAMB registration number on the PUME Application Website. His/Her JAMB data set (see above) will show up and the student will be requested to upload a passport picture. After uploading the picture the student can print out the PUME Acknowledgement Slip for presentation in the examination hall. The picture must be displayed on the Acknowledgement Slip as well as the Admission and Hostel Allocation Slip (see below). Furthermore, a member account with Application PIN (or random) password will be assigned. The password is also displayed on the PUME Acknowledgement Slip.
Data fields to be shown on the PUME Acknowledgement Slip:
JAMB Registration Number
Student's Name
Study Programme/Course (Certificate)
Sex
PUME Application Date
PUME Exam Date
PUME Venue
Password
Other fields to be added to the student's record will include:
Passport Photograph with red background (has to be uploaded here)

PUME General Paper (relevant after the PUME Exams)
PUME English Score (relevant after the PUME Exams)
PUME Mathematics Score (relevant after the PUME Exams and
                        applicable only to Local Programme Students)
PUME Total Score (relevant after the PUME Exams)
The student goes to the examination hall and writes the examination.
The examination officer compiles exam results into an Excel spreadsheet. The Portal Manager uploads and imports the data.
Data fields to be imported:
PUME General Paper
PUME English Score
PUME Mathematics Score (applicable only to Local Programme Students)
The student checks the exam results on the PUME Results Checking Website. To access the website he/she reuses his/her Application PIN and enters the password (printed on the PUME Acknowledgement Slip). He/She will see the results and can print out the PUME Result Slip.
Except the password, the PUME Results Checking Website shows the same data as the PUME Acknowledgement Slip. Additionally the PUME results are displayed: English, Mathematics and General (papers 1, 2 and 3 respectively)
The Admission Board decides on those students to be admitted and compiles the Admission List which is then uploaded and imported by the Portal Manager.
The student checks for admission to the university on the Admission Checking Website and prints out the Admission Slip. To enter the website he reuses his Application PIN together with the password. He/she will also see the study programme (certificate) he/she is admitted to. This can differ from the student's choice and has to be officially accepted by the student by signing a letter of acceptance to be presented later to the Clearance Officer (formerly done by filling the online Acceptance Form which is now deprecated).
The student buys a Clearance Access Card and proceeds to the Clearance and Eligibility Form where he/she enters the corresponding PIN and the password first.
The Eligibility Form contains the following data:
Entry Date
Access Code
Session
Registration No
Student's Name
Sex
Faculty
Course Major
Passport Picture
The data are not editable and are taken from the students record compiled so far.
The student has to fill the following fields:
Date of Birth
Local Government
Nationality
1st Sitting (SSCE, WAEC, GCE, NECO, NABTEB): Exam Number, Exam Date, Exam Type, Exam Subjects, Exam Grades
2nd Sitting (SSCE, WAEC, GCE, NECO, NABTEB): Exam Number, Exam Date, Exam Type, Exam Subjects, Exam Grades
Advanced Level Results: Exam Number, Exam Date, Exam Subjects, Exam Grades
Other Qualifications: Higher Qualification, Higher Grade, School Attended, Matric Number, Session Obtained, Discipline
The relationship between Higher Qualification and Higher Grade is:
Bachelor Degree:
 First Class
 Second Class (Upper Division)
 Second Class (Lower Division)
 Third Class
 Pass

Higher National Diploma:
 Distinction
 Upper Credit
 Lower Credit
 Pass

Ordinary National Diploma:
 Distinction
 Upper Credit
 Lower Credit
 Pass

National Certificate of Education:
 Distinction
 Credit
 Merit
 Pass

University Diploma:
 Distinction
 Credit
 Merit
 Pass
The student has to upload scanned documents which show the results of all examinations done before.
A Local Programme student already entered his/her results of previous examinations in his/her Local Programme Application Form (see Step 1). These data must be carried over into Clearance Form. In contrast to a PUME applicant, the result data are not editable by the student in the Clearance Form.
Then he/she has to tick appropriate documents to be presented for clearance process.
Furthermore the student can defer admission till next session by ticking an appropriate box. Finally, the student has to confirm possessing all the qualifications which he/she claims to have obtained.
The student goes with all documents to the Clearance Officer who validates the entered data and uploaded files. Finally the Eligibility Form is printed and signed by both the student and the Course Manager.
The student is now properly admitted to the university and is a member of the portal.
The Matriculation Number is generated by the system.
The student has to fill the Personal Data Form which contains all sorts of personal information. Now he/she is also able to change the password for accessing his/her personal portal member area which has been automatically created after Clearance Validation. The basis for Personal Data Form is the data already gathered from the Clearance and Eligibility data. Other details such as permanent home address, next of kin, sponsor and all other such related information are filled in here. The information does not have direct relevance to course registration, but are useful for generation of School identity cards.
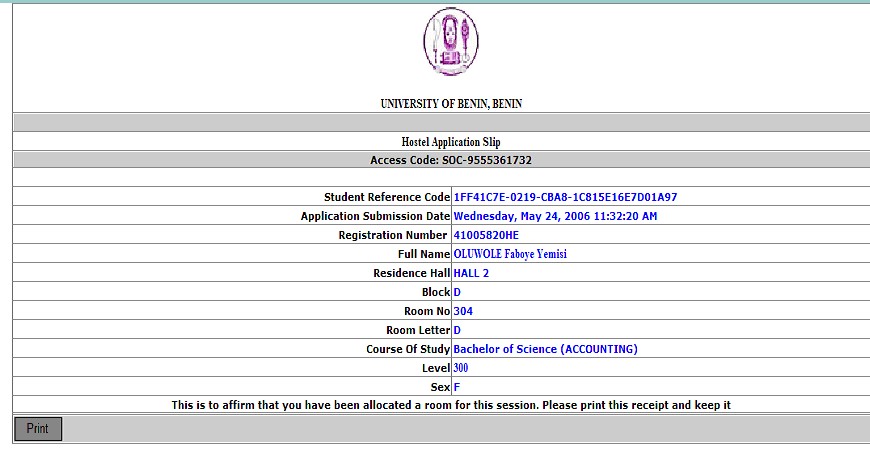
The student buys a Hostel Application Access Card and proceeds to the Hostel Application Form where he/she enters the PIN. The systems determines if there is free bed space according to the students attributes: sex, study programme, study level, special needs. Beds are allocated according to the 'first come, first serve' principle. The bed allocation algorithm is shown in a separate flow chart.
The student prints the Hostel Allocation Slip.
Additionally, this form must also display the passport picture from the student's record.
The student buys a Hostel Maintenance Card which belongs to the allocated hostel and pays his/her Hostel Fee by entering the PIN on the Hostel Maintenance Website.
The student prints the Hostel Maintenance Receipt.
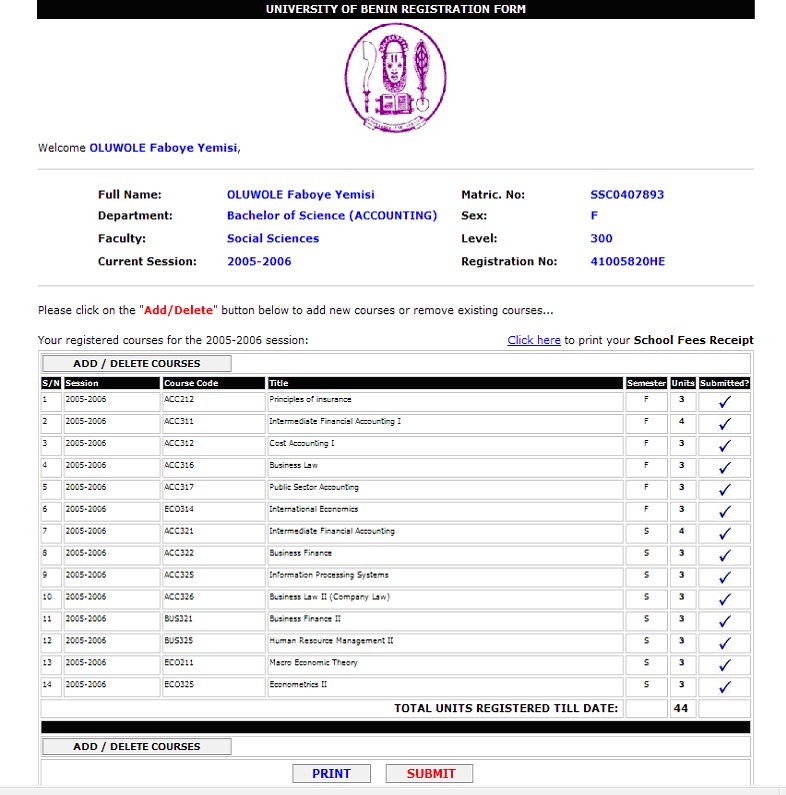
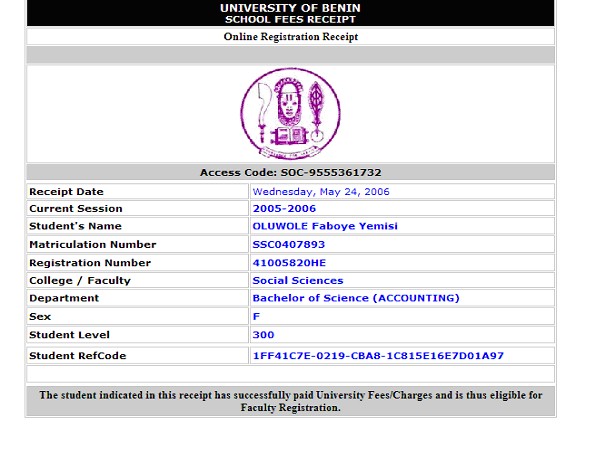
The student buys a School Fee Card which belongs to his/her study programme or faculty respectively. After entering the PIN on the Course Registration Form, the student is able to add (or delete) courses from a list of courses which are automatically generated by the portal according to the student's study programme and level. The total credit load must not exceed 50 units. Otherwise the student is requested to reduce the load.
The student prints the School Fees Receipt.
The Course Adviser controls and validates the registered courses. This step can be omitted if the course registration process runs completely automatically.
Returning Students proceed with the above described admission and registration process at Step 11 (Hostel Allocation). They log in with their Matriculation Number and their Password (Step R1). Before they can apply for accommodation or register new courses their previous session result must have been uploaded online by the Portal Manager (Step R2). Only Categories A (passed all courses) and B (passed some but have some carryovers) are eligible to register for a new level in the new session and also to apply for accommodation. The students placed in Category C are students that have just enough credits to remain in the faculty and repeat the level (probation). They are allowed to register for the same level but not to apply for accommodation. The students placed in Category D or higher are either expected to withdraw from the university or been allowed to probate after consulting respective authorities. The latter requires portal manager validation.
Exception: 200 level Medical students represent a unique group of students who do not write sessional examinations and will thus be allowed to apply for accommodation when they have successfully registered for level 300. That inadvertently means they have to be allowed to register for 300 level without results for their 200 level.
The students print out the Sessional Result Slip. A Student is not allowed to see his scores but rather the grade and Sessional GPA. The Result Slip however also shows the student's name, matric number, registration number, course of study, faculty, session and level.
Steps 11 - 13 are then identical. Only during course registration the so-called 'carryovers', i.e. the courses that were failed in the previous session, are picked up by the system and listed first.
Direct Entry (DE) Students bypass Step 1 - 4. The Excel Data sheet from JAMB is directly sent to the Admission board. The following procedure is identical as the one for the UME Students.
For admission into Diploma (full and part time), Degree (part time) and Post graduate programmes (full and part time) students can bypass the JAMB admission procedure and apply directly at the university. Only the entry examination (Step 2) then differs and is called Local Programme Examination. The Local Programme Application Form can be combined with the PUME Application Form (Step 1). However, the application for this requires their results to be added; scanned unlike Post UME where the result is scanned and added after the student has been admitted. If the results are not yet available the students can tick a box called 'awaiting results'.
Also the 'JAMB data' have to be filled manually. The registration number is generated internally with the pattern of 3-alphabets representing the study programme, 6 digits random number and 2-digits representing the year.
For example: DIA000001/06 means the first person to log in is for Diploma in Accounting and is applying in the 2006/2007 session.
(description of portal content types will follow)
(forthcoming)
The Access Card (Scratch Card) data are kept outside of the main portal and managed only by the Access Card Manager.
The data fields of Access Card records are:
Series Batch Code
Access Code
Matric or Registration Number
Cost
Generated By
Date Activated
Sold by
Each Access Code starts with a prefix depending on the Access Card's function, i.e. what it is used for. The prefix also defines the value of the Access Card.
Administrative PINs:
Application                       APP
Clearance                         CLR
Hostel Application                HOS
Hostel Maintenance
 Old Hostels (Halls 1, 2, 3, 4)   HMU
 New Hostel (Hall 5)              HMF
 Postgraduate Hostel              HMP
Gown Hiring                       GWN
School Fee PINs:
AGRICULTURE                       AGR
ARTS                              ART
BASIC MEDICAL SC.                 BMS
DENTISTRY                         DEN
EDUCATION                         EDU
ENGINEERING                       ENG
LAW                               LAW
LIFE SCIENCE                      LSC
PHYSICAL                          PSC
PHARMACY                          PHA
MEDICINE                          MED
SOCIAL SCIENCES                   SSC

Masters in Bus. Admin.            MBA
Masters in Public Admin           MPA
Masters Banking & Fin.            MBF
Masters in Law                    LLM
Masters in Public Health          MPH
Bachelors in Public Adm           BPA
Bachelors in Accounting           BIA
Bachelors in Social Wks           BSW
Diploma in Public Adm             DPA
Diploma in Law                    DIL
Diploma in Data Proc.             DDP
Diploma in Comp. Eng              DCE
For New Students NEW is added to the School Fee PIN prefixes. For example, a new student in the Education Faculty will need to buy a Scratch Card with Prefix: EDUNEW.
The following information will be printed on the Scratch Card:
XXX-1-12345678
XXX-1-1234567890 (conceiled)
The Portal Manager is the main system administrator (or Zope manager) who has exclusive rights to access all parts of the portal including the Zope Management Interface (ZMI).
The University Manager is able to set up the infrastructure of the entire university and to provide content specific to the university.
The Student Manager is able to access and edit student records.
The Clearance Officer has access to the eligibility data of all students. His only function is to validate the clearance and eligibility data on the basis of the material presented by each student.
Only the Matric Number Manager is allowed to edit Matriculation Numbers and to access and configure the Matric Number Generation tool.
The only function of the Access Card Manager will be to generate and administer the Access Codes (PINs).
The Faculty Manager sets up the infrastructure of his/her faculty and provides content specific to his/her faculty. He/She can add or change departments and can assign local roles within all departments.
The Department Manager is the supervisor of the Course Adviser und the Lecturers. The DM will manage the content provided by the department (staff list, publication lists, etc). He/She can assign local roles (CA and L) within his/her department. At the current stage the local DM role is not needed.
The Course Adviser is responsible for the study programmes of the department. He/She selects the courses (from the entire university course list) for each study programme and validates the registered courses of each student who is studying in the department. The CA role is a sub-role of the Department Manager.
The Lecturer will be responsible for the courses and course material provided to the students. At the current stage this local role is not needed.
The Hostel Manager sets up and manages the infrastructure of all hostels.
Course specific data (including list of participants) are under version control. Each session new course objects are created on the basis of the data of the previous session.